Keeping a two-language LaTeX resume in sync
Today I finally had time to update my Résumé. So I imported an old version in a new Git repo and set out to do it right once and for all:
- Use one of the many CV classes available
- Devise a mechanism to keep the German and English version in sync
I settled for moderncv
(see the ‘examples’ subdirectory for some nice examples). It’ll
automatically create the headers, align all the CV items — and does a
pretty good job at providing a simple yet good-looking and versatile
\cventry command.
I’m now keeping a single cv.tex file that will get processed
differently according to which file I want to compile. The Makefile
looks like this:
DEFAULT: cv-en.pdf cv-de.pdf
cv-en.pdf: cv.tex
    pdflatex -jobname cv-en cv
cv-de.pdf: cv.tex
    pdflatex -jobname cv-de cv
The -jobname argument will influence where the output file will be
saved. Also, it is available from within the LaTeX document as such:
\usepackage{etoolbox}
\usepackage{ifthen}

\newtoggle{de}
\newcommand{\de}[2]{\iftoggle{de}{#1}{#2}}

\ifthenelse{\equal{\detokenize{cv-de}}{\jobname}}{
  \toggletrue{de}
}{
  \togglefalse{de}
}
So if the job name is cv-de, then the de toggle will be true. With
the little \de helper function, I can now use something like
\title{\de{Lebenslauf}{Résumé}}
or
\cvlistdoubleitem{
  \de{Deutsch (Muttersprache)}
     {German (native speaker)}
}{
  \de{Englisch (fließend)}
     {English (fluent)}
}
throughout the document. A simple distrib rule that contains a
scp command to upload the PDFs to a website, and I’m done for today.
Oh, by the way: If you know a company in the Dubai or Abu Dhabi region that might be interested in giving me a two-month internship opportunity — please contact me! CV available on request ;-)
Represent directory structures in LaTeX
When writing the git book we faced a problem: when dealing with an example repository, how do you describe a directory structure?
Simply "writing" about it is the cheap apporach, although pretty stupid: most readers (including me) would skip over the paragraph. Later, they'd be confused when we'd refer to a specific property of the repository layout.
The intermediate approach was to simply paste the output of the tree
unix command. That was hard to "parse" though, and didn't look well.
It is clear that a graphic representation of the directory structure is optimal. But: how? The easiest way would be to install some graphical application that can represent tree-structures, such as Nautilus. There are no upsides to this, but two minor downsides: it looks crappy, and it requires you to install some hundred megabytes of gnome-wtf-libs.
The major downside is this: If you want to re-do the screenshot, you'll need the same directory structure, the same setup, GNOME styles, same selection to grab, ... there is no easy way to automate this.
Not wanting to settle for the cheap way, what were the goals our solution had to meet?
- can be understood at one glance (important)
- can be automated and tracked in git (important)
- does not eat up much space on the page
- doesn't depend on colors
An alternative that came to my mind was to use GraphViz's
neato tool. I wrote a Perl script to convert a directory structure
to a diagram. The code's too cruel to be released to the world. You
can imagine what it looks like by invoking:
neato -Txlib <<EOF
graph G {
  n1 [shape=folder width=1 style=filled label="baz" pos="0.00,0.00!"];
  n2 [shape=box height=.2 width=1 labelloc=t label="file" pos="0.00,-0.60!"];
  n3 [shape=folder width=1 style=filled label="foo" pos="0.00,-1.20!"];
  n4 [shape=folder width=1 style=filled label="bar" pos="1.20,-1.20!"];
  n3 -- n4;
  n1 -- n2 -- n3;
}
EOF
However, this output did not meet above criteria #3&4. It looked even
cheaper than simple tree output.
The solution we settled for was dirtree.sty. It works like this:
You download the dirtree.sty and dirtree.tex file, place them
within your project and add a \usepackage{dirtree}. In theory, you
can then include a \dirtree{} declaration (see the docs for
details).
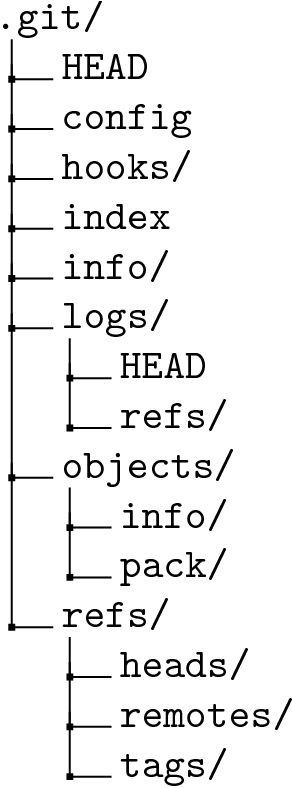
For example, this code (note the percent sign on line #1)...
\dirtree{ %
.1 .git/.
.2 HEAD.
.2 config.
.2 hooks/.
.2 index.
.2 info/.
.2 logs/.
.3 HEAD.
.3 refs/.
.2 objects/.
.3 info/.
.3 pack/.
.2 refs/.
.3 heads/.
.3 remotes/.
.3 tags/.
}
will produce the following graphic:
However, since it's not part of the LaTeX standard distribution, you cannot be sure about it's stability. It may use "dangerous" LaTeX constructs, etc... certainly nothing you want to include "as-is" in a book that'll eventually be printed. Also, the book will go through a conversion process to be distributed as an Ebook. You wouldn't want such a little LaTeX hack to be a show-stopper – or, worse yet, discover document corruption just after you got some thousand fresh copies from the printing press.
EPS/PDF files are stable, however. So what we did was this:
- Put the
\dirtree{}statements into separate files, including some\begin{document}stuff so that it will compile to a PDF file containing just the diagram. - Remove any whitespace. We use pdfcrop for that.
- Convert to EPS.
In terms of Makefile statements, Valentin came up with this:
files=objektmodell-programm-crop\
    svn-stdlayout-crop\
    svn-nonstdlayout-crop\
    svn-branches-crop\
    git-branches-crop\
    git-dir-crop

pdfs=$(addsuffix .pdf, $(files))
epss=$(addsuffix .eps, $(files))

all: $(pdfs) $(epss)

clean:
    -rm -v *.pdf *.eps *.aux *.log

%.pdf : %.tex
    pdflatex $<

%-crop.pdf : %.pdf
    pdfcrop $<

%-crop.eps : %-crop.pdf
    pdftops -eps $< $@
Now it's as simple as make -C dir-listings && git add dir-listings
(with an appropriate .gitignore file) to record changes to diagrams
and recompile the PDF and EPS files. If you don't plan to keep the
compiled files in your repository, you can also add a dependency for
the subdirectory to your main Makefile.